Showing posts with label #CustomerAppreciation. Show all posts

Monday, March 14, 2022

Kylie and Bruno Bertucci’s Demonstrator Blog Hop - March 2022


Thank you for joining us for our Stampin' Up!® Demonstrator Training Program Monthly Blog Hop! I hope you find ideas and creative inspiration as you visit all of the blogs. We are a group of Stampin' Up!® Demonstrators from around the world that are taking part in training that is helping us to build a successful Stampin' Up!® business and reach goals we have set. We really appreciate your support.

You may be starting here or have come from another blog - either way you can find the link list at the bottom of this post so that you can see every blog post and idea today. We really appreciate your support.


My customer Thank You cards for March are the easiest pocket card I've ever made. I watched Karen Titus' video the other day and was inspired! These cards came together very quickly; you will also find these cards are a great way to use your designer series paper. 

Begin with a 12" x 12" Designer Series Paper. Cut one side (directional paper will need a bit more thought before cutting) to 10 3/4 ". Score this at 1" and 5 1/2" - you will fold the 1" piece down on the front of your card. Now turn your paper 1/4 turn (the 12" side will be at the top of your Paper Trimmer.) Cut at 4" and 8". HINT: be careful scoring your DSP as it is not as sturdy as cardstock. 


Fold on the score lines, the one inch fold is toward the front. You can decide which side of the DSP you want on the front. I mixed it up a little, choosing my favorite for the third card.


Before adhering to a piece of 4 1/4 x 5 1/2 inch piece of cardstock, I added ribbon across the front of the flap by putting SEAL on the back of the card then adhered the ends of the ribbon on the back. 
I used my silicone mat to keep adhesive from sticking somewhere it shouldn't! 


I took another piece of ribbon and tied a bow. Next, I adhered the pocket to the piece of cardstock.


Next I stamped the insert with a sentiment and put a strip on the bottom of Basic White cardstock cut at 3 3/4" x 5". The envelope also has a stip of DSP on the bottom. The sentiment is from Honeybee Home Stamp set. I used my stamparatus to quickly stamp 12 inserts. Three rhinestone basic jewels accent the bottom corner.


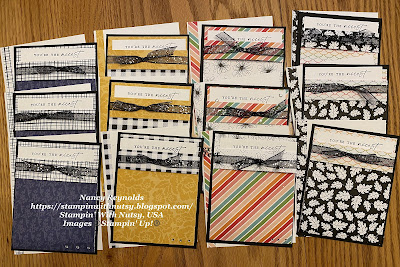
I now have my thank you cards ready to go! 

BLOG HOP LINKS:

I am an Independent Stampin' Up Demonstrator in the United States and would be honored to be your demonstrator if you do not already have one. I am happy to help you with orders, online workshops, or welcome you to my team, Nutsy's Stampers. 

Monday, February 8, 2021

Kylie's Demonstrator Support Program Blog Hop February 2021


Thank you for joining us for our Stampin' Up!® Demonstrator Training Program Monthly Blog Hop! We are so happy that you could join us today for this blog hop for ideas and creative inspiration. We are a group of Stampin' Up!® Demonstrators from around the world that are taking part in training that is helping us to build a successful Stampin' Up!® business and reach some goals we have set. We really appreciate your support.

You may be starting here or have come from another blog - either way you can find the link list at the bottom of this post so that you can see every blog post and idea today.

Our them is Thank You cards for our customers this month and I was inspired by the Free Sale-A-Bration Designer Series Paper, Flower and Field. 


Cards all ready to send in February. The Flower and Field (a free Sale-A-Bration reward for a $50 order) is 6" x 6". I created a template and marked 2" in on each side. I think this is a case of a picture is worth 1,000 words so I'll attach the step by step pictures.


It's not a complicated process to cut these pieces, just a bit hard to put into words. If you have questions please contact me, I'm happy to try to explain.

Next I embossed basic white cardstock cut at 4" x 5 1/4" using the Painted Texture 3D Embossing Folder, then adhered the Designer Series Paper to the card.

A Just Jade ribbon and the Thank You sentiment from Heal Your Heart (also a Sale-A-Bration item) complete the front which is adhered to a basic black cardbase. 


Thank you so much for stopping by to visit my blog. There are many more awesome projects to visit on this blog hop so click the link below to hop along.

BLOG HOP LINKS:

If you live in the USA and do not have a demonstrator, I would be happy to be your creative coach; please let me know if you need a catalog.

Click here to see supplies used and shop.


Sunday, August 23, 2020

 CUSTOMER APPRECIATION GLOBAL FACEBOOK LIVE EVENT - AUGUST 29, 2020

If you are not already part of this private group and are a customer of mine, please let me know and I will send you an invitation. This fun event begins in Australia, travels to the United Kingdom, then finishes in North America with Canadian and US Demonstrators.

Group members enjoy the Facebook Lives, creating along with the demonstrators, and then access to all of the videos from past events.