Monday, January 10, 2022

Kylie and Bruno Bertucci’s Demonstrator Blog Hop - January 2022


Thank you for joining us for our Stampin' Up!® Demonstrator Training Program Monthly Blog Hop! I hope you find ideas and creative inspiration as you visit all of the blogs. We are a group of Stampin' Up!® Demonstrators from around the world that are taking part in training that is helping us to build a successful Stampin' Up!® business and reach goals we have set. We really appreciate your support.

You may be starting here or have come from another blog - either way you can find the link list at the bottom of this post so that you can see every blog post and idea today. We really appreciate your support.


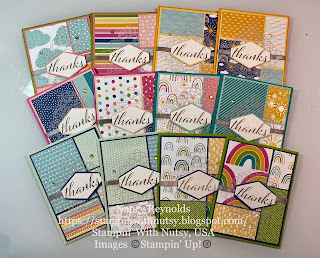
I saw this layout by Karen Titus and mixed it up with one from Jackie Bolhuis that I used a few years ago, a patchwork quilt. 

I pulled out the new (in the January - June 2022 Mini Catalog) Sunshine & Rainbows 6 x 6 in. Designer Series Paper and the matching cardstock. 


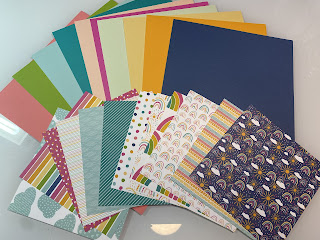
I cut the 6 x 6 in designer series paper into 3 3/4 in x 5 1/4 in (9.5 cm x 13.9 cm) pieces. There are 12 designs in the package, perfect for 12 thank you cards!

I decided to challenge myself to use each cardstock color for either the cardbase or the mat layer (4 in x 5 1/2 in) (10 cm x 13.4 cm). It was fun matching cardstock colors to the DSP. I used 2 pieces of DSP and alternated front/back so each piece is a different pattern. 

Examples:


I ran a stip of Gray Granite Shimmer Ribbon across the front, glued the ends on the back with Seal, and added my sentiment - Thanks from the Artistically Inked Stamp set stamped onto Shimmery White Cardstock using Memento Tuxedo Black Ink. Both the DSP layer and the sentiment are attached with dimensionals.

It still needed some embellishment so I added the Iridescent Rhinestone Basic Jewels.


 //

My favorite is #1, which do you like best?

BLOG HOP LINKS:


am an Independent Stampin' Up Demonstrator in the United States and would be honored to be your demonstrator if you do not already have one. I am happy to help you with orders, online workshops, or welcome you to my team, Nutsy's Stampers. 


SUPPLIES:

Product List


Monday, November 15, 2021

Bruno & Kylie Bertucci’s Demonstrator Training Blog Hop - November 2021


Thank you for joining us for our Stampin' Up!® Demonstrator Training Program Monthly Blog Hop! I hope you find ideas and creative inspiration as you visit all of the blogs. We are a group of Stampin' Up!® Demonstrators from around the world who are taking part in training that is helping us build a successful Stampin' Up!® business and reach goals we have set. We really appreciate your support.

You may be starting here or have come from Theresa McEntree's blog post, isn't her card lovely!  You will find the link list at the bottom of this post so that you can see every blog post and idea today. 

In our busy world it is sometimes difficult to remember to send thank you cards! By preparing cards early in the month we’ve got them on had to send to customers. It feels great to be prepared! 


My customer thank you cards are designed using the new Collection - Eden’s Garden. The Specialty Designer Series Paper is absolutely gorgeous. The greens are Soft Succulent and Evening Evergreen with gold accents. 


I find the supplies artfully arranged makes me feel creative and gives me a start on my card. The the Eden’s Garden Collection I added Gold Foil Sheets and ribbon. 


I cut the gold accents (frame and leaves) from the first layer. No one would know I’d made so many cut outs once the Specialty Designer Series Paper was adhered.


I stamped thanks on the Soft Succulent Cotton Paper in Evening Evergreen Ink. The gold frame sets it off nicely. The sentiment is from the Artistically Inked stamp set. The Cotton Paper compares to a thick tissue paper. I ran a strip of Seal in the middle of the Evening Evergreen layer, the stamped sentiment hides the adhesive surprisingly well. 


All that was left to do was tie bows and put the card together.


Finished cards using all 6 paper designs.  The first card I made had the focal piece in the center of the card, but that had the leaves in the lower corner a bit scrunched together so I decided to move it to the upper left corner.

Measurements:


Blog Hop Links: 


am an Independent Stampin' Up Demonstrator in the United States and would be honored to be your demonstrator if you do not already have one. I am happy to help you with orders, online workshops, or welcome you to my team, Nutsy's Stampers.

Supplies:

tams# 65798

Product List