Sunday, April 25, 2021


Welcome to my blog, thank you for visiting. If you aren't working with a Demonstrator I would be happy to help you with orders, questions you may have, and I can send you our new Catalog. 

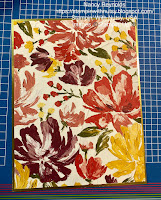
We do have a new Annual Catalog starting on May 4, 2021 which means many items in the 20-21 Annual Catalog are retiring. I thought I would use the retiring Band Together Bundle (Stamps and Dies) for this card showcasing the beautiful Fine Art Floral Designer Series Paper (DSP). 

I love it when the DSP does all the work for me. I hope you enjoy these cards.


It may seem a little odd, but I like to get my supplies out before I start to create, it inspires me. I didn’t think of taking a picture until I had already begun. 


Measurements: 1/2 sheet of cardstock for the card base in Calypso Coral.
Layer 1 - Gold Foil - 4 1/8” X 5 3/8”  
Layer 2 - Designer Series Paper - 4” X 5 1/4”
Inside Layer - Basic White - 4 1/8” X 5 3/8”
Strip of the DSP for the inside white layer

I began by cutting the band out of the middle of the gold foil layer, I stamped my sentiment onto a scrap of Basic White cardstock using Mossy Meadow Ink. Although the band is quite large, the angle allows enough space around the edges so the whole is completely hidden when I adhered the DSP to the top. 

 
Before adhering this layer to the cardbase, wrap the band and tack down the sides on the back using glue dots. I used Stampin' Dimensionals to adhere the focal layer to the cardstock.

You will notice that I took pictures using two different DSPs. I like to be efficient so I cut my cardbase by first scoring the entire sheet of cardstock at 5 1/2", then I cut at 4 1/4" so I have two cardbases. Making 2 cards is almost as easy as making 1.

Once the front was complete, I adhered a piece of cardstock on the bottom of the Basic White Cardstock and adhered to the inside of the card. And since pretty shouldn't stop at the card, I adhered DSP to the envelope flap and a piece on the front of the envelope.


I left the inside of the card blank for future use. I can stamp a sentiment or write a longer note, depending on what is needed.

Thank you again for visiting my blog and I do hope you have been inspired. 

Please contact me if you are looking for a demonstrator, I would love to help you. I am also growing my team, Nutsy’s Stampers and would love to welcome you as a team member.

SUPPLIES:
Product List


Monday, April 12, 2021

Kylie Bertucci's Demonstrator Training Blog Hop April 2021

Thank you for joining us for our Stampin' Up!® Demonstrator Training Program Monthly Blog Hop! We are so happy that you could join us today for this blog hop for ideas and creative inspiration. We are a group of Stampin' Up!® Demonstrators from around the world that are taking part in training that is helping us to build a successful Stampin' Up!® business and reach some goals we have set. We really appreciate your support.

You may be starting here or have come from another blog - either way you can find the link list at the bottom of this post so that you can see every blog post and idea today.


Our theme is Thank You cards for our customers this month. I was feeling a bit whimsical this month and combined the Hey Birthday Chick stamp set with some retiring products. I am very happy to see the Stamp Set is continuing but the dies are sold separately. Also continuing in the 2021-2022 Annual Catalog is the Tailored Tag Punch. 

I used the Thick Basic White Cardstock for my cardbase, added a layer of Just Jade both inside and outside, used basic white cardstock for stamping the front and inside. 

The wire is stamped using the All Wired Up background stamp with Smokey Slate Ink; I find the Stamparatus to be a great tool with these large stamps. 


The Designer Series Paper is Flowers for Every Season cut with the Tailored Tag punch. I stamped the chicken using Memento Black Tuxedo Ink and colored with Blends. Our chicken is full of sparkle, her body is colored with Wink for Stella.. For fun, I attached the chicken with wobbles I found while cleaning my stamp room. Of course, I checked all the wobbles to make sure they worked, LOL, in other words, I had fun playing with the cards.

I stamped my sentiment in the balloon.  The second picture is the inside of the card.


I hope you enjoy hopping with us today!

BLOG LINKS:


If you are looking for a demonstrator in the USA please contact me using the link above. I would be happy to help with your orders or welcome you to my team - Nutsy's Stampers. 

SUPPLIES:

I switched out the Mango Melody Blends for the Daffodil Delight Blends in the supplies because Mango Melody Blends are retiring.

Product List